You're scrolling through an AI art gallery — DeviantArt, ArtStation, Twitter, or a Discord server — and you stop at an image that's exactly what you've been trying to create. The lighting is perfect. The composition is stunning. The style is precisely what you want.
The problem: you don't know the prompt. And even if you did, would copying it actually give you the same result?
This is the art of reverse prompt engineering — extracting the visual DNA of an image and translating it back into a text prompt. When done well, it's one of the most powerful skills an AI artist can develop. This guide walks you through the complete process.
Why Reverse Engineering Works (And Its Limits)
AI image generators are trained to map text prompts to visual outputs. Reverse engineering exploits this relationship: if a model can go from text → image, then with the right tools, you can also go from image → text approximation.
It's not perfect. AI generators have inherent randomness (controlled by seed values), and the same prompt will produce variations, not identical copies. But reverse engineering gets you close enough to:
- Recreate the overall aesthetic and mood
- Apply the same style to different subjects
- Build on an existing visual style with your own creative additions
- Understand how specific visual effects are achieved
Method 1: Use an AI Image-to-Prompt Tool
The fastest approach is to use a dedicated image-to-prompt converter like ImageToPrompt. These tools use vision AI to analyze your reference image and generate a complete prompt formatted for your target model.
The workflow:
- Save the image you want to reverse engineer
- Upload it to ImageToPrompt.dev
- Select the AI model you want to use (Midjourney, Stable Diffusion, Flux, etc.)
- Get a ready-to-use prompt in seconds
This is the approach most professional AI artists use as a starting point. It handles the time-consuming work of identifying and articulating visual details, letting you focus on refinement.
Try it yourself — upload any image and get an optimized AI prompt in seconds.
Try Free →Method 2: Manual Visual Decomposition
Even with AI assistance, understanding how to manually decompose an image makes you a much stronger prompt engineer. Here's how to read any image systematically:
Analyze the Subject
Start with the obvious: what's in the image? Be specific. "Woman" is weak. "A young woman in her mid-20s with shoulder-length dark hair, wearing a vintage leather jacket" gives the AI much more to work with.
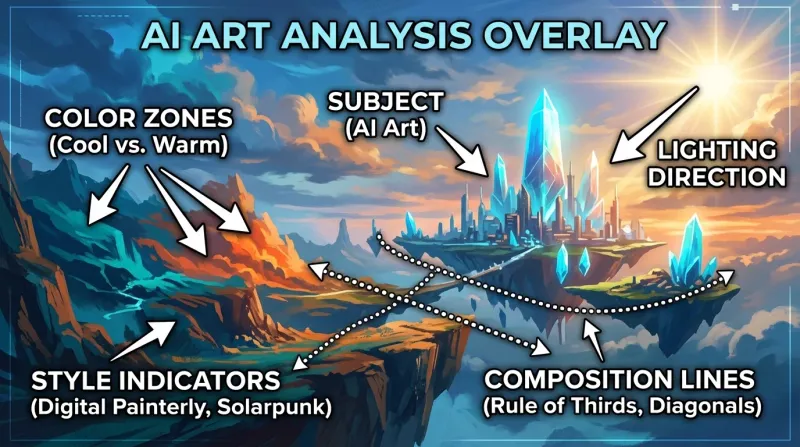
Visual decomposition: identifying each element in an image before translating it to prompt language. Click to view full size.
Read the Lighting
Lighting is one of the most powerful elements in any image. Ask yourself:
- Where is the light source? (front-lit, side-lit, backlit, rim-lit)
- How hard or soft is the light? (harsh direct sunlight vs. diffused overcast sky)
- What color is the light? (warm golden hour, cool blue dusk, neutral studio)
- Are there secondary light sources or colored gels?
- How dramatic are the shadows?
Identify the Style and Medium
Is this photographic or painted? If photographic: what camera, what lens? If painted: what medium (oil, watercolor, digital), what artist style (impressionist, hyperrealistic, anime)?
Useful style descriptors include: cinematic, hyperrealistic, painterly, concept art, illustration, watercolor, cel shading, photorealism, editorial
Note the Color Palette
AI generators respond strongly to color descriptions. Identify:
- Dominant colors (2–4 colors that define the image)
- Overall temperature (warm, cool, or neutral)
- Saturation (vibrant, muted, desaturated)
- Contrast level (high contrast, flat, low contrast)
Describe the Composition
How is the image framed? Common composition descriptors:
- Shot type: close-up, medium shot, wide shot, aerial view, worm's eye view
- Depth of field: bokeh, shallow DOF, deep focus
- Rule of thirds, centered composition, leading lines
- Negative space
Method 3: Combine Both — The Professional Workflow
The most effective approach combines AI analysis with manual refinement. Here's the full workflow that professional AI artists use:
Step 1: Generate a Base Prompt
Upload your reference image to ImageToPrompt and generate an initial prompt. This gives you ~80% of the way there and usually takes under 30 seconds.
Step 2: Manually Review and Annotate
Look at the generated prompt critically. Compare it against the image. What's missing? What's wrong? Specific things to check:
- Is the lighting described accurately?
- Does the style description match what you see?
- Are there important compositional elements missing?
- Are there dominant colors that aren't mentioned?
Step 3: Add Artist References (Optional)
For stylistic images, adding an artist name can dramatically improve results. "In the style of Greg Rutkowski" or "in the style of Makoto Shinkai" signals a complete visual vocabulary to the model. Use this ethically — reference style, not specific works.
Step 4: Test and Iterate
Generate 4–8 variations with your refined prompt. Compare them to your reference. Identify the biggest gaps and adjust the prompt to close them. Repeat until satisfied.
Complete Walkthrough: Reverse Engineering One Image
Let's walk through the complete process on a single image — combining automated analysis with manual refinement to produce a prompt that actually recreates the result.
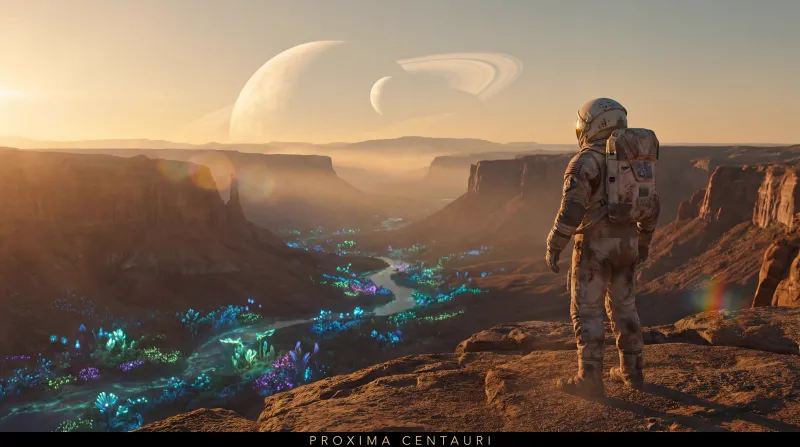
The reference image we're reverse engineering. Click to view full size.
Step 1: Automated Analysis
After uploading to ImageToPrompt with Midjourney selected, the tool generated:
dramatic fantasy portrait of a female warrior, battle-worn armor with intricate engravings, fierce expression, rim lighting from behind with warm orange glow, particle effects and embers, dark atmospheric background, cinematic concept art, digital painting, highly detailed --ar 2:3 --v 6.1 --style raw --q 2
Step 2: Manual Observations
Reviewing the automated output against the original image, two things stood out. First, the AI didn't capture the specific color contrast — the armor had a verdigris (aged copper-green) tint that wasn't mentioned. Second, the background wasn't just "dark" — it had a smoky, almost volcanic atmosphere with visible ash particles. Neither of these made it into the first prompt.
Step 3: The Refined Prompt
Adding the missed elements and adjusting emphasis:
dramatic fantasy portrait of a female warrior, battle-worn armor with verdigris patina and intricate engravings, fierce determined expression, rim lighting from behind with warm volcanic orange glow, ash particles and floating embers, smoky atmospheric background with volcanic haze, cinematic concept art, digital painting, highly detailed, deep shadow contrast --ar 2:3 --v 6.1 --style raw --q 2
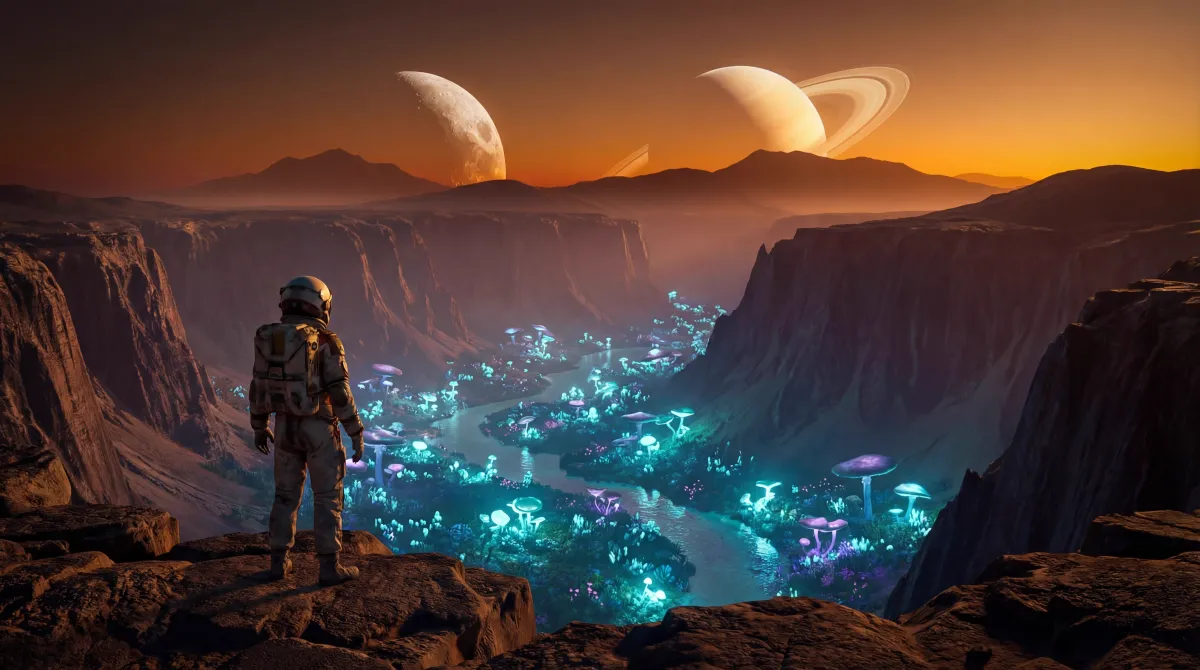
Result using the refined prompt. The verdigris tint and volcanic atmosphere are now present.
The two additions — verdigris patina and volcanic atmosphere — fundamentally changed the color story of the image. This is what manual observation adds to automated analysis: the specific details that make an image distinctive rather than generic.
Model-Specific Reverse Engineering Tips
Reversing Midjourney Images
Midjourney has a distinctive aesthetic — sharp detail with painterly qualities. When reversing Midjourney images, include Midjourney-specific parameters: --style raw for less opinionated output, or --v 6.1 for the latest version. Add --chaos 15-25 if you want more variation in your results.
Reversing Stable Diffusion Images
SD images often have tells: specific model checkpoints produce characteristic artifacts. If you know the image was made with SDXL, use an SDXL checkpoint. Include a strong negative prompt to avoid SD's common issues: blurry, low quality, bad anatomy, watermark, text.
Reversing Flux Images
Flux produces extremely photorealistic images. When reversing Flux output, focus on photographic language: lens types, camera settings, natural lighting descriptions. Flux responds well to technical photography terminology.
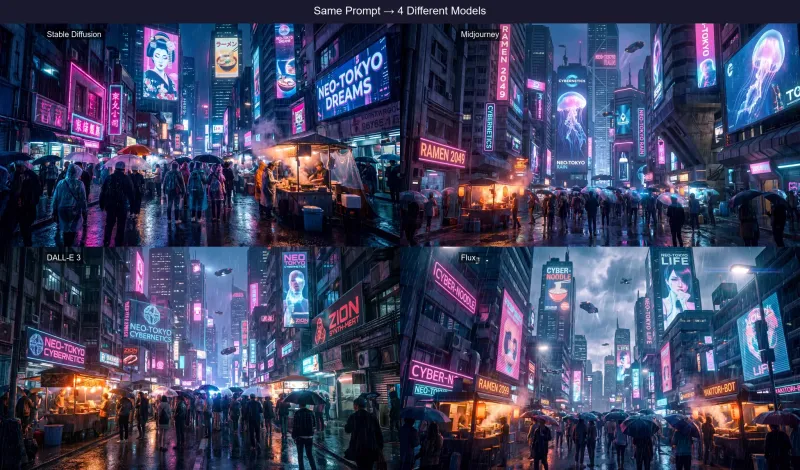
Same Image, Different Models
The same reference image produces very different prompts depending on which AI model is selected. Here's why that matters and what the differences look like in practice.
Midjourney
dramatic portrait, strong directional lighting, deep shadows, intense gaze, cinematic photography style --ar 2:3 --v 6.1 --style raw
Stable Diffusion
(photorealistic:1.2), dramatic portrait, (strong rim lighting:1.3), deep shadows, (intense gaze:1.1), professional photography
Negative: blurry, low quality, deformed, bad anatomy, watermark
Flux
High-resolution photograph of a person in dramatic portrait lighting. Strong rim light from the left creates deep shadows. Shot with Canon EOS R5, 85mm f/1.4, shallow depth of field, cinematic color grading.
DALL·E 3
A dramatic portrait photograph with strong directional lighting creating deep shadows on one side of the face. The subject has an intense, direct gaze. Cinematic, professional quality with shallow depth of field.
Each prompt captures the same image but in its model's native language. Midjourney uses concise descriptors and parameters. Stable Diffusion uses weighted syntax and a negative prompt. Flux uses photographic/technical language. DALL·E 3 uses complete natural sentences. The same visual content, four different formats.
Ethical Considerations
Reverse engineering AI art is generally fine — you're working within the training paradigm these models operate in. But a few considerations:
- Don't claim someone else's AI art as your own. Reverse engineering to learn is fine; passing off the result as original art created by you without referencing the source is misleading.
- Be careful with real photographs of people. Extracting a prompt from a photo and then generating AI images of a specific real person raises serious ethical and legal issues.
- Check platform terms. Some platforms prohibit using their AI-generated images as training data or reverse engineering inputs. Read the terms before proceeding.
Advanced Technique: Style Transfer via Prompt
Once you've extracted a good style prompt from a reference image, you can apply it to any subject. This is called prompt-based style transfer, and it's one of the most creative uses of reverse engineering.
Example: You reverse engineer a beautifully lit golden-hour portrait and get a prompt like: "cinematic portrait photography, golden hour rim lighting, shallow depth of field, warm amber and rust tones, film grain, Canon 85mm f/1.4"
Now replace the portrait subject with anything: a building, a landscape, a still life, an animal. The lighting and style information transfers to the new subject, giving you consistent aesthetics across very different imagery.
Start Reverse Engineering in Seconds
Upload any image to ImageToPrompt and get a complete, model-specific prompt ready to use in Midjourney, Stable Diffusion, or Flux.
Try the Free Image to Prompt Generator →